


Unified Modeling Language (UML) provides a standardized notation for visualizing software systems. However, the standard set of diagrams often lacks the specificity required for specialized domains. This is where the UML Profile Diagram becomes essential. It allows architects to extend the language without altering its core metamodel. This guide explores the mechanics, construction, and application of UML profiles in a structured, practical manner.
🧩 Understanding the Core Concept
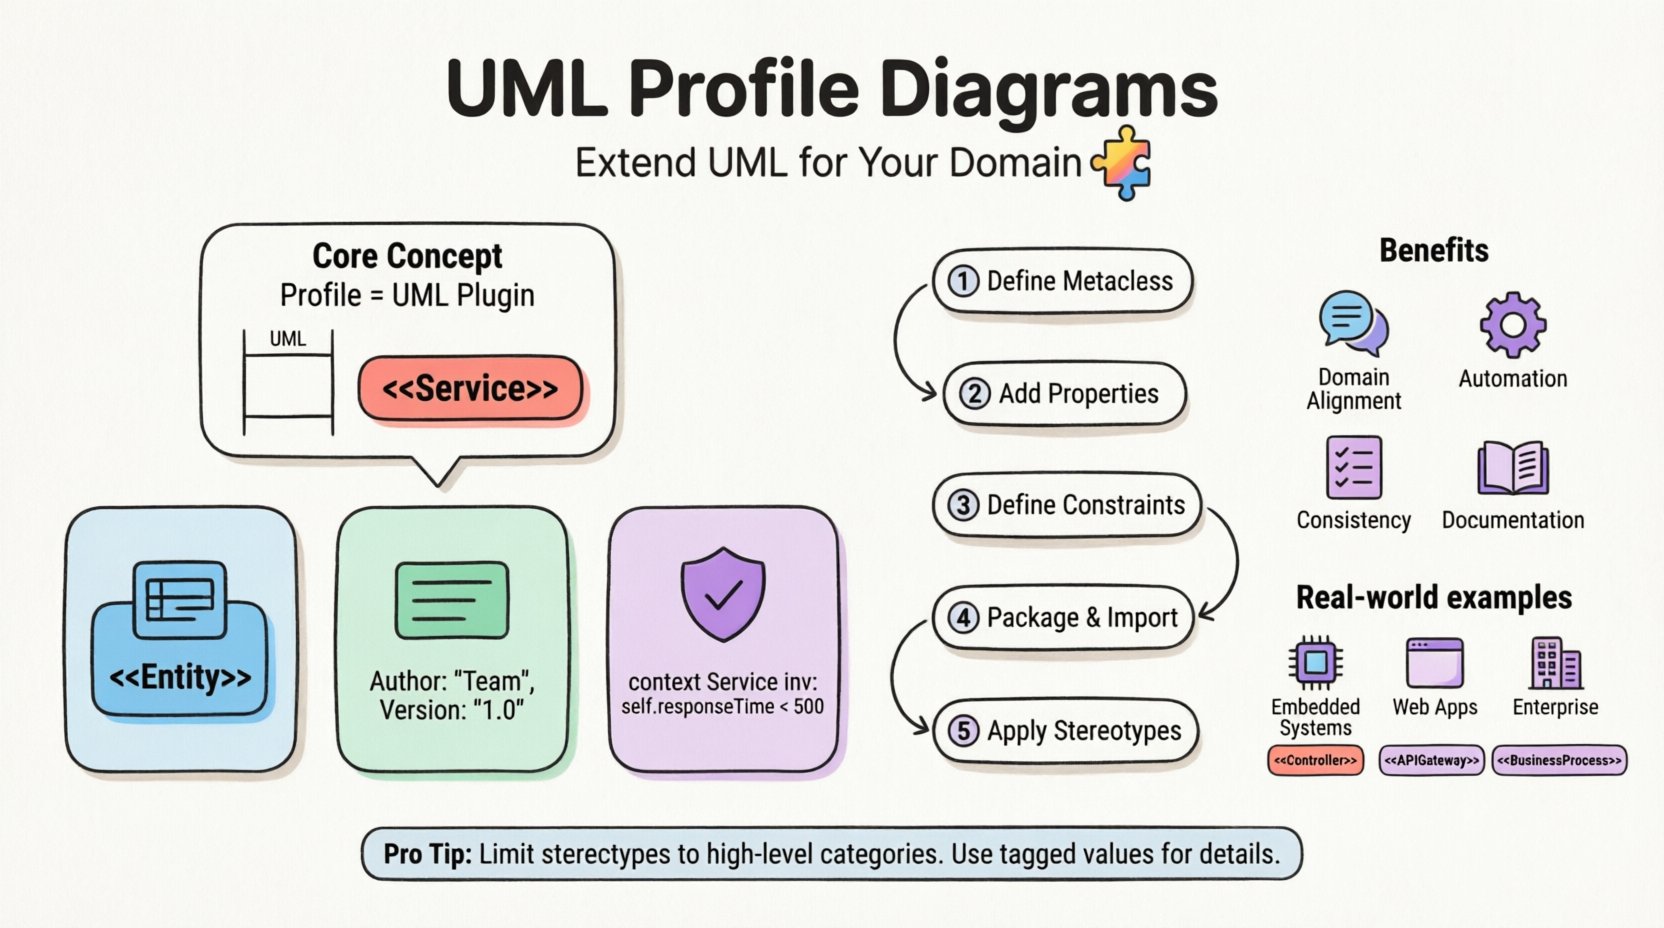
A UML Profile is a mechanism for customizing UML to suit specific needs. Think of it as a plugin for the modeling language itself. It does not change the syntax of UML but adds new meanings to existing elements or creates entirely new ones within a defined context.
Profiles operate on the principle of extensibility. They enable domain-specific modeling (DSM) by allowing teams to define terminology that aligns with their business or technical vocabulary. For example, a medical software team might define a stereotype called <<PatientRecord>>, whereas a financial team might prefer <<LedgerEntry>>. Both utilize the same underlying class structure but carry different semantic weight.
Key characteristics include:
- Non-Intrusive: Profiles do not modify the UML specification.
- Reusable: A profile can be shared across multiple projects within an organization.
- Modular: Profiles can be imported and merged into other models.
- Visual: They are represented using standard UML diagram types, primarily Class Diagrams.
🛠️ Anatomy of a UML Profile
Constructing a profile involves defining specific elements that extend the standard metaclasses. These elements form the building blocks of the extension.
1. Stereotypes
Stereotypes are the primary tool for extension. They classify model elements into new categories. When applied to a standard element, they alter its semantics while retaining its structural properties. A stereotype is denoted by double angle brackets, such as <<Component>> or <<Service>>.
For instance, extending the Class metaclass allows a developer to mark a specific class as a database table. This signals to the code generator or documentation tool that this class requires persistence logic.
2. Tagged Values
Tagged values allow you to attach additional properties to model elements. These are key-value pairs that provide metadata. Unlike standard attributes, tagged values do not generate code in the object model unless explicitly configured.
Common examples include:
- Author: The creator of the element.
- Version: The version number of the component.
- Constraint: A specific business rule associated with the element.
- Priority: The importance level of a requirement.
3. Constraints
Constraints define rules that model elements must adhere to. These are often expressed in the Object Constraint Language (OCL). Constraints can be applied to stereotypes or standard elements to enforce validity.
For example, a constraint might state that a <<User>> class must have an attribute named "email" which follows a specific format. This ensures data integrity at the design phase.
📊 Profile Components vs. Standard UML
| Component | Standard UML Usage | Profile Extension Usage |
|---|---|---|
| Stereotype | None (Built-in types only) | Defines custom classifications (e.g., <<Entity>>) |
| Tagged Value | Standard properties only | Custom metadata (e.g., "SQLType") |
| Constraint | OCL for logic | Domain-specific rules (e.g., "MaxRetries") |
| Dependency | General dependency | Profile Import or Application dependency |
🚀 Why Use Profiles?
Implementing profiles offers significant advantages in complex software architecture. It bridges the gap between generic modeling and domain reality.
- Domain Alignment: It allows the model to speak the same language as the stakeholders. Business analysts can read diagrams using terms they understand.
- Automation: Tools can interpret stereotypes and tagged values to generate code scaffolding automatically.
- Consistency: A defined profile enforces a standard way of modeling across different teams.
- Documentation: Profiles make the intent of the design explicit without cluttering the visual representation.
🏗️ Step-by-Step Construction Logic
Building a profile involves a logical process of definition, extension, and application. This section outlines the workflow.
Phase 1: Define the Metaclass Extension
First, identify which standard UML metaclasses need extension. Usually, this involves the Class, Component, or UseCase metaclasses. You create a new class within the profile package that inherits from the standard metaclass. This new class acts as the blueprint for the stereotype.
Phase 2: Add Properties to the Stereotype
Once the metaclass extension is established, define the properties. These become the tagged values. For example, if extending a Class to represent a Database Table, add properties for "TableName", "PrimaryKey", and "IndexType".
Phase 3: Define Constraints
Apply constraints to ensure the new elements behave correctly. This might involve ensuring that a specific attribute exists or that a relationship is valid. Constraints are typically written in OCL but can also be natural language rules for non-technical stakeholders.
Phase 4: Package and Import
Group the stereotypes, tagged values, and constraints into a single package. This package is the Profile itself. Other models must import this package to access the new definitions. The import relationship ensures that the profile definitions are available in the target model context.
Phase 5: Application
Apply the stereotypes to actual model elements. This is done by selecting an element and assigning the stereotype. The element then adopts the properties defined in the profile. Visual cues, such as text labels, update to reflect the applied stereotype.
🎨 Stereotypes Explained in Depth
Stereotypes are the face of the profile. They change how an element is perceived. There are three main categories of stereotype usage.
- Structural: These define the type of the element. Examples include <<Interface>>, <<Implementation>>, or <<Controller>>.
- Behavioral: These define how the element acts. Examples include <<Transaction>>, <<Event>>, or <<Handler>>.
- Descriptive: These provide context without changing structure. Examples include <<Deprecated>>, <<ReviewPending>>, or <<External>>.
When designing stereotypes, clarity is paramount. Avoid overly generic names. Instead of <<Thing>>, use <<DataStore>>. This reduces ambiguity during code generation and documentation.
📝 Tagged Values and Constraints
Tagged values add depth to the model. They allow for the storage of information that is not part of the runtime object model.
Managing Tagged Values
- Data Types: Define the type for each value. Use "String" for text, "Integer" for numbers, and "Boolean" for true/false states.
- Default Values: Set default values where appropriate. This reduces the need to fill out every field manually.
- Documentation: Provide descriptions for each tagged value. This explains what the value represents to other modelers.
Implementing Constraints
Constraints ensure that the model adheres to rules. They are critical for validation.
- Preconditions: Rules that must be true before an operation occurs.
- Postconditions: Rules that must be true after an operation completes.
- Invariants: Rules that must always be true for the model element.
For example, a constraint on a <<User>> stereotype might state that the "Status" attribute must be either "Active" or "Inactive". This prevents invalid states from being modeled.
🔄 Profile Organization and Reusability
Profiles are most effective when organized correctly. A disorganized profile leads to confusion and inconsistent modeling.
- Namespace Management: Keep profiles in their own namespace or package. This prevents naming conflicts with standard UML elements.
- Versioning: Maintain versions of your profiles. As domain requirements change, the profile should evolve without breaking existing models.
- Merging: Allow profiles to merge. If you have a "Security" profile and a "Data" profile, they should be able to coexist in the same model.
- Documentation: Create a separate document describing the profile. This should include the rationale for each stereotype and tagged value.
⚠️ Common Pitfalls and How to Avoid Them
Even with a solid plan, mistakes can occur during profile implementation.
1. Over-Stereotyping
Creating too many stereotypes can clutter the diagram. It becomes difficult to distinguish between standard elements and extended ones.
- Solution: Limit stereotypes to high-level categories. Use tagged values for granular details.
2. Circular Dependencies
Profiles sometimes depend on each other. If Profile A imports Profile B, and Profile B imports Profile A, the model will fail to load.
- Solution: Establish a hierarchy. Core profiles should be imported by specialized profiles, not vice versa.
3. Ignoring Standard Syntax
Modifying the visual representation too much can confuse readers. If you use a shape that looks like a standard UML element but means something else, it causes misinterpretation.
- Solution: Stick to standard UML shapes. Use the stereotype label to convey the extension.
📈 Integration with Standard UML Diagrams
Profiles are not standalone diagrams. They are applied to existing diagram types.
Class Diagrams
This is the most common use case. Classes are extended with stereotypes to define their role. Attributes and operations inherit the constraints defined in the profile.
Sequence Diagrams
Messages and lifelines can be stereotyped. For example, a message might be marked as <<Synchronous>> or <<Asynchronous>> to indicate protocol behavior. Tagged values can define timeout durations.
State Machine Diagrams
States can be classified using stereotypes. A state might be marked as <<Final>> or <<EntryPoint>>. This helps in understanding the flow of control more precisely.
✅ Best Practices for Documentation
Documentation ensures that the profile remains usable over time.
- Glossary: Maintain a glossary of all stereotypes and tagged values used in the profile.
- Examples: Provide concrete examples of how a profile element looks in a diagram.
- Change Log: Track changes to the profile. Note when a stereotype was added, modified, or deprecated.
- Training: Ensure modelers understand how to use the profile. A profile is useless if the team does not know how to apply it.
⚖️ Comparison with Other Extension Mechanisms
UML offers different ways to extend functionality. Understanding the differences helps in choosing the right approach.
| Mechanism | Flexibility | Complexity | Use Case |
|---|---|---|---|
| Profile | High | Medium | Domain-specific customization |
| Subclassing | Low | Low | Simple hierarchy extension |
| Composition | Medium | Medium | Structural aggregation |
| Meta-Modeling | Very High | Very High | Creating new languages |
Profiles strike a balance between flexibility and complexity. They are easier to implement than full meta-modeling but offer more power than simple subclassing.
🌐 Real-World Scenarios
Consider the following scenarios where profiles add value.
Embedded Systems
In embedded systems, memory constraints are critical. A profile can define <<MemoryMapped>> and <<StackAllocated>> stereotypes. Tagged values can specify memory addresses and sizes. This information is used by the compiler to optimize memory layout.
Web Applications
For web applications, a profile might define <<APIEndpoint>> and <<View>>. Tagged values can specify HTTP methods (GET, POST) and response codes. This aids in API documentation generation.
Enterprise Architecture
In enterprise architecture, profiles help map IT assets to business capabilities. A stereotype like <<BusinessCapability>> can be linked to <<ITSystem>> stereotypes. This provides a clear view of how technology supports business goals.
🔍 Future Considerations
The use of profiles continues to evolve. As modeling tools become more intelligent, profiles will play a larger role in automated code generation and analysis.
- AI Integration: Tools may suggest profile applications based on context.
- Standardization: Industry-wide profiles may emerge for common domains.
- Interoperability: Profiles will become more critical for exchanging models between different organizations.
📝 Summary of Implementation Steps
To summarize the practical approach to UML Profile Diagrams:
- Identify the domain needs that standard UML does not cover.
- Define the metaclass extensions required (usually Class or Component).
- Create stereotypes for specific element types.
- Add tagged values for metadata.
- Define constraints using OCL or text.
- Package the profile into a reusable unit.
- Import the profile into the target model.
- Apply stereotypes to relevant elements.
- Document the profile for future reference.
By following these steps, teams can create a robust modeling environment that aligns with their specific requirements. The result is a clearer, more maintainable system design that communicates intent effectively.