


Unified Modeling Language (UML) provides a standardized way to visualize the design of a system. However, standard UML diagrams often lack the specificity required for complex domain modeling. This is where UML Profile Diagrams become essential. A profile extends the UML metamodel without changing its core semantics, allowing architects to define domain-specific constructs. These constructs typically include stereotypes, tagged values, and constraints. Creating a clear and maintainable profile diagram requires a disciplined approach. This guide outlines the technical strategies for designing effective UML profiles.
🧩 Understanding the Anatomy of a Profile Diagram
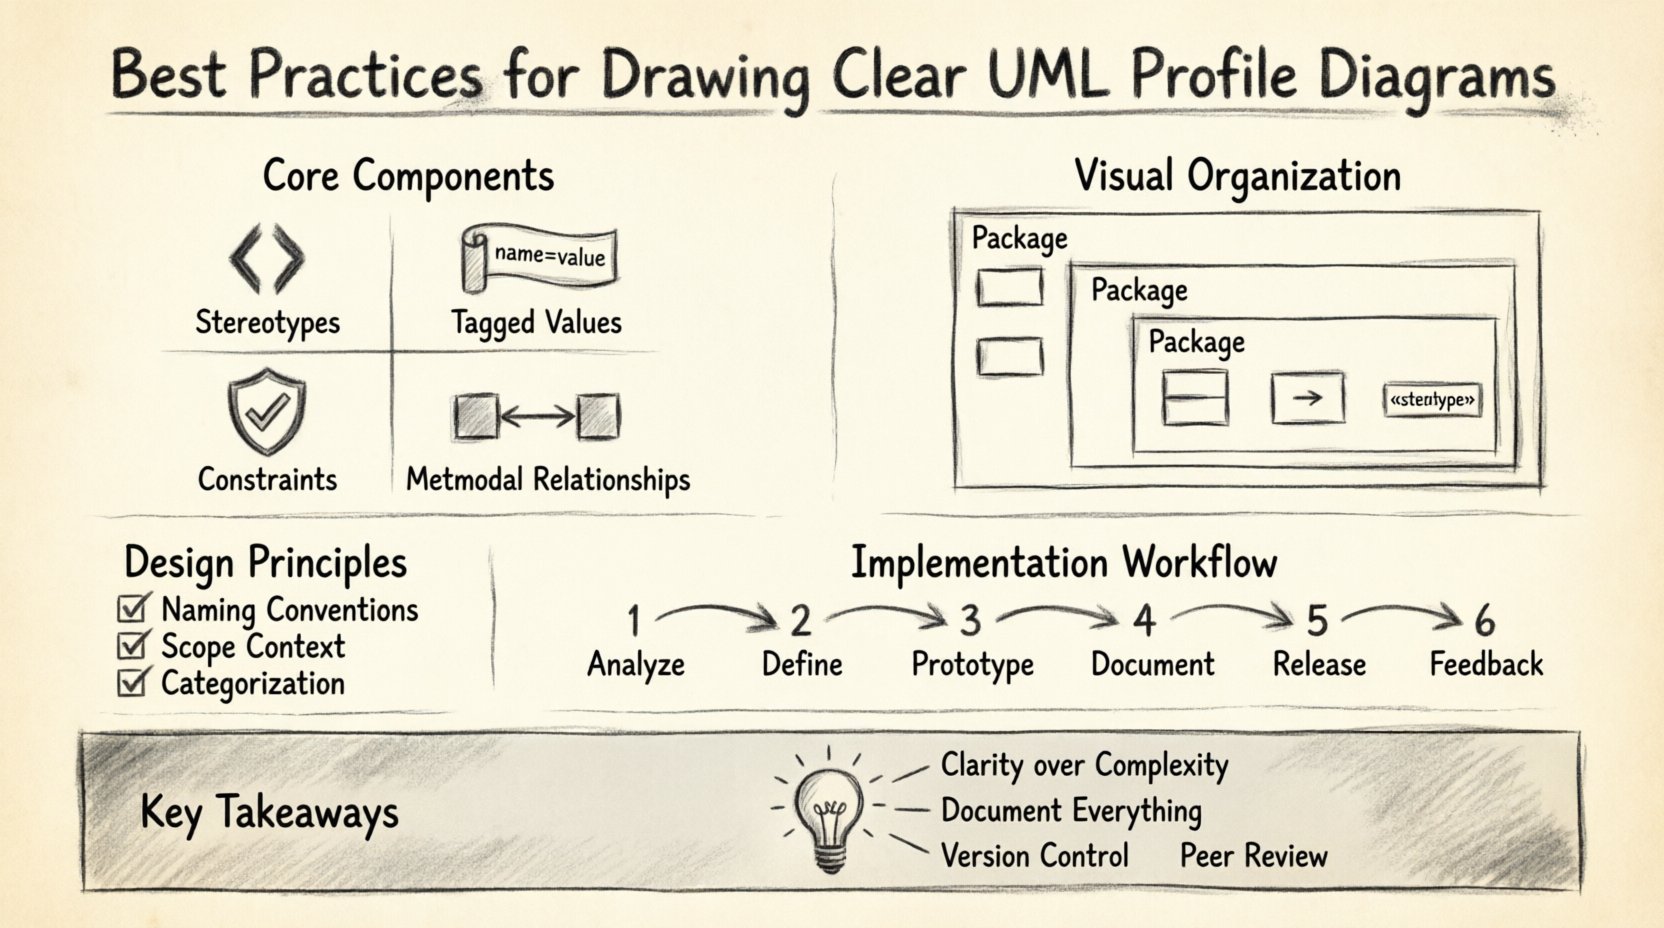
Before drawing, one must understand the building blocks. A UML Profile is not a diagram in the traditional sense of showing runtime behavior or static structure. Instead, it is a package containing definitions. These definitions modify how elements in other diagrams are interpreted. The core components include:
- Stereotypes: These are the primary extension mechanism. They allow you to create new types of elements, such as <
>, < >, or < >. They appear as text enclosed in guillemets. - Tagged Values: These provide additional attributes for stereotypes. For example, a <
> stereotype might have a tagged value named “Protocol” with a value of “HTTP”. - Constraints: These define rules that must be adhered to. They can be written in natural language or formal languages like OCL (Object Constraint Language).
- Metamodel Relationships: Profiles relate to the UML metamodel through extensions. They define which base classes can be extended.
When constructing these diagrams, clarity is paramount. The goal is to ensure that any engineer reading the profile understands the extension rules without ambiguity.
🎨 Design Principles for Stereotypes
Stereotypes are the face of your profile. They determine how developers label elements within their models. Poorly designed stereotypes lead to confusion and inconsistent modeling practices.
1. Naming Conventions
Names must be unique within the profile and descriptive enough to convey intent. Avoid generic names like “MyElement”. Instead, use domain-specific terminology.
- Use CamelCase or PascalCase: Ensure consistency across the profile.
- Keep it Short: Long stereotype names clutter diagrams.
- Avoid UML Keywords: Do not use names that conflict with standard UML keywords unless extending them specifically.
For instance, rather than using “DataHolder”, consider “Repository” if the context is data access. This aligns the model with the actual software architecture.
2. Scope and Context
Every stereotype has a context. It should only extend elements that make logical sense. Extending a Class to behave like a Database is valid. Extending a Package to behave like a Method is not.
- Define Base Classes: Clearly specify which UML metaclasses the stereotype extends.
- Limit Applicability: Restrict the stereotype to specific packages or contexts if necessary to prevent misuse.
🏷️ Managing Tagged Values Effectively
Tagged values add metadata to your elements. They are crucial for generating code, documentation, or validation scripts. However, too many tagged values can overwhelm the diagram.
1. Categorization
Group tagged values logically. Separate configuration data from structural data. Use a naming convention that indicates the purpose of the value.
- Prefixing: Use prefixes like
cfg_for configuration orapi_for API details. - Data Types: Define the data type for each tagged value (String, Integer, Boolean, Enumeration).
2. Default Values
When possible, assign default values to tagged values. This reduces the burden on modelers to specify every attribute manually. If a stereotype is applied, the default value should be reasonable for the majority of cases.
🛡️ Defining Constraints and Rules
Constraints ensure the integrity of the model. They act as guardrails for the modeling process. Constraints can be visual or textual.
- Visual Constraints: Use notes or diagrams to show relationships that cannot be captured by standard UML.
- Textual Constraints: Use OCL for precise logical expressions.
For example, a constraint might state: “A <
📐 Visual Layout and Organization
Even though a profile is a definition set, how it is presented on the page matters. Cluttered diagrams are hard to maintain. Follow these layout strategies:
1. Use Packages for Separation
Organize stereotypes into packages based on domain area. For example, separate a “Business Logic” package from a “Data Access” package. This keeps related stereotypes together and reduces cognitive load.
2. Grouping Related Elements
Keep stereotypes, their tagged values, and constraints visually grouped. Do not scatter them across the canvas. Use borders or swimlanes if the modeling environment supports them.
3. Consistency in Notation
Ensure all stereotypes use the same font size, border style, and color scheme. Visual consistency reinforces the idea that these are part of a unified system.
🔄 Integration with Base Models
A profile is useless if it does not integrate well with the base UML model. The relationship between the profile and the model must be explicit.
1. Import and Dependency Management
Profiles often depend on other profiles or standard UML libraries. Clearly define these dependencies. Use the import or dependency relationships to show that one profile requires another to function correctly.
2. Application to Existing Elements
When applying a profile to an existing model, ensure that existing elements can be successfully extended. If a stereotype requires a specific property that an existing class lacks, the model will be invalid. Validation tools can help catch these issues before deployment.
📋 Best Practices Checklist
To ensure your profile diagrams meet high standards, use the following checklist during the review process.
| Category | Checklist Item | Status |
|---|---|---|
| Naming | Are stereotype names unique and descriptive? | ☐ |
| Structure | Are packages used to organize related stereotypes? | ☐ |
| Metadata | Do tagged values have defined data types? | ☐ |
| Constraints | Are critical rules defined in OCL or text? | ☐ |
| Visuals | Is the layout consistent and uncluttered? | ☐ |
| Dependencies | Are external profile dependencies documented? | ☐ |
⚠️ Common Pitfalls to Avoid
Even experienced architects make mistakes when designing profiles. Being aware of common pitfalls can save significant time during maintenance.
1. Over-Engineering
Do not create a stereotype for every single variation in your system. If two elements behave differently but share the same structure, consider using tagged values instead of creating a new stereotype. This keeps the profile lean.
2. Ignoring Tool Support
While no specific software should be referenced, it is important to remember that different modeling tools handle profiles differently. Ensure your profile syntax is compatible with the tools used by your team. If a tool does not support a specific constraint type, the constraint will be ignored, leading to silent errors.
3. Lack of Documentation
Profiles are often used by developers who were not involved in the design. Without clear documentation, the meaning of a stereotype can be lost. Always include a description for every stereotype and tagged value explaining its purpose and usage.
📝 Documentation Standards
A profile is a specification. It requires documentation that is as rigorous as the code it helps define.
- Usage Examples: Provide concrete examples of how to apply the stereotype in a model.
- Code Generation Rules: If the profile drives code generation, document the mapping rules. Explain how a <
> stereotype translates to a Java interface or C# class. - Version History: Keep a log of changes. Profiles evolve. Documenting why a change was made helps future maintainers understand the rationale.
🔄 Maintenance and Versioning
Profiles are living artifacts. As the system architecture changes, the profile must adapt. Versioning is critical for managing these changes.
1. Semantic Versioning
Adopt a versioning strategy. Increment the major version if changes break existing models. Increment the minor version for backward-compatible additions. This allows teams to migrate models safely.
2. Deprecation Policies
When removing a stereotype or tagged value, do not delete it immediately. Mark it as deprecated. Provide a migration path for existing models. This prevents breaking changes for active projects.
🔍 Advanced Extension Techniques
For complex systems, standard extensions may not suffice. Advanced techniques can provide deeper integration.
1. Nested Profiles
Profiles can extend other profiles. This allows for a hierarchy of extensions. A generic “Web” profile can extend a base “System” profile. A specific “REST” profile can extend the “Web” profile. This modular approach promotes reuse.
2. Custom Diagrams
Some modeling environments allow you to create custom diagram types based on your profile. If your profile defines a specific architectural pattern, you can create a diagram template that automatically applies the correct stereotypes and layout rules.
🤝 Collaboration and Standards
Profiles are often shared across teams and organizations. Standardization is key to collaboration.
- Community Profiles: If possible, use industry-standard profiles (such as those for SOA or Microservices) as a base. This reduces the learning curve for new team members.
- Review Process: Establish a review process for new stereotypes. Require peer approval before adding a stereotype to the core profile.
- Training: Conduct training sessions for modelers. Ensure everyone understands how to apply the stereotypes correctly.
📊 Measuring Profile Quality
How do you know if your profile is effective? You can measure it through usage metrics and feedback.
- Adoption Rate: Are teams using the stereotypes consistently?
- Validation Errors: Are there frequent errors when applying stereotypes? This indicates ambiguity.
- Code Generation Success: Does the generated code match the model expectations? If not, the profile definitions may be incomplete.
🛠️ Implementation Workflow
A structured workflow ensures that profiles are created systematically. Follow these steps:
- Requirement Analysis: Identify what domain concepts are missing from standard UML.
- Definition: Draft the stereotypes, tagged values, and constraints.
- Prototype: Apply the profile to a small section of the model to test validity.
- Documentation: Write the usage guide and examples.
- Release: Publish the profile to the shared repository.
- Feedback: Gather feedback from users and iterate.
🔗 Summary of Key Takeaways
Designing a UML Profile Diagram is a balance between flexibility and structure. The profile must be flexible enough to capture domain nuances but structured enough to remain understandable. By following the naming conventions, organizing elements logically, and maintaining rigorous documentation, you create a profile that serves as a reliable contract for your system architecture.
Remember that a profile is a tool for communication. If the diagram is confusing, the model will be misunderstood. Prioritize clarity over complexity. Regular reviews and version control will keep your profile relevant as the system evolves.