


Entering the world of software architecture often feels like navigating a dense forest without a map. Among the various tools available to chart this territory, the Unified Modeling Language (UML) stands as a foundational standard. However, standard UML diagrams sometimes fall short when addressing specific domain requirements. This is where UML Profile Diagrams become indispensable. For a junior developer, understanding how to extend UML without breaking its core rules is a critical skill that separates basic coding from true architectural design.
This guide provides a deep dive into the mechanics, purpose, and application of UML Profiles. We will explore how to define stereotypes, manage tagged values, and create constraints that align your models with your specific technology stack or business domain. The goal is not to memorize syntax but to understand the logic behind extensibility in modeling.
Understanding the Core Concept 🧠
A UML Profile is a mechanism for customizing the UML language. Think of UML as a programming language itself, and a Profile as a library or framework written on top of it. Standard UML elements like Classes, Interfaces, and Packages are designed to be generic. They describe software structure without knowing if the software is written in Java, Python, or C++, or if it runs on a microservices architecture or a monolithic system.
When you create a Profile, you are essentially telling the modeling tool or the team: “In this specific project, a Class means something slightly different.”
Profiles allow you to:
- Define domain-specific terminology (e.g., changing “Class” to “Service” or “Entity”).
- Add metadata to elements without cluttering the visual diagram.
- Enforce architectural rules through constraints.
- Bridge the gap between abstract design and concrete implementation.
It is important to note that Profiles do not replace the UML Metamodel. They extend it. The underlying structure remains intact, ensuring that diagrams created with Profiles can still be understood by tools that do not recognize the custom definitions, though they may display them as standard elements.
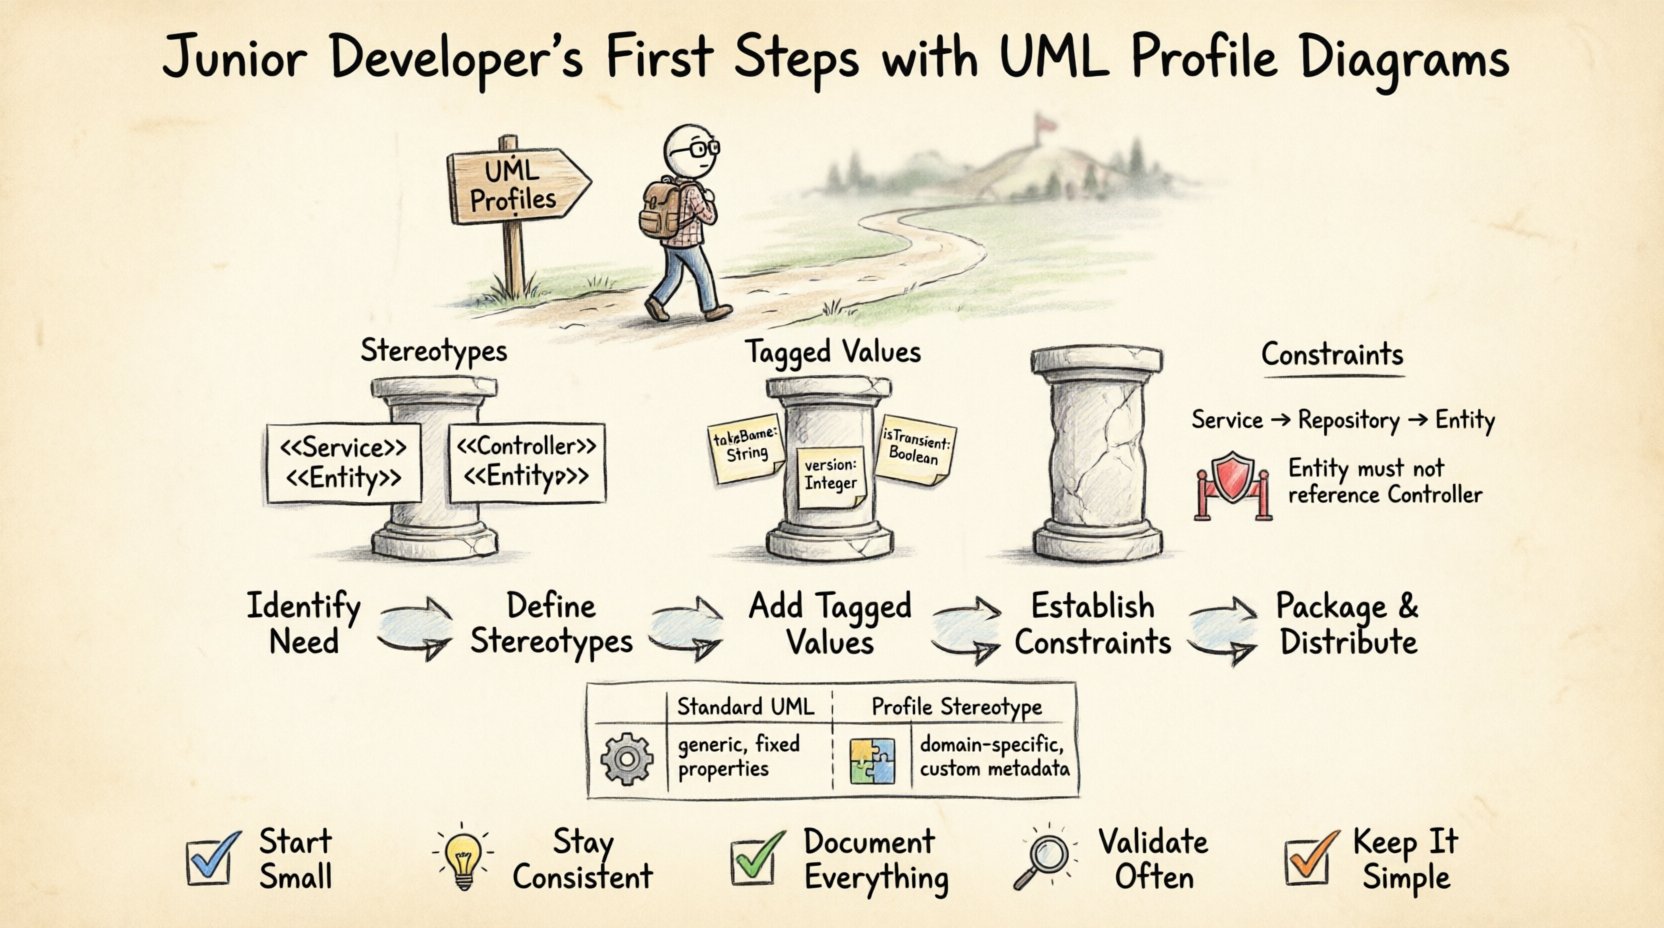
Anatomy of a Profile 🛠️
Building a robust Profile requires understanding its constituent parts. A Profile is not just a list of new icons; it is a structured set of definitions that map to the existing UML metaclasses. The three primary components you will work with are Stereotypes, Tagged Values, and Constraints.
1. Stereotypes: The Label System
Stereotypes are the most visible part of a Profile. They allow you to add a new name to a standard UML element. Visually, they often appear as text within guillemets (e.g., <<Service>>).
When you apply a stereotype to a Class, you are changing its semantic meaning. A standard Class represents a blueprint for objects. A Class with the <<Entity>> stereotype implies it represents persistent data in a database. A Class with <<Controller>> implies it handles request logic.
Key characteristics of stereotypes:
- They are derived from the Classifier metaclass.
- They can be applied to multiple types of elements (e.g., a stereotype might apply to both Classes and Interfaces).
- They must be defined within the Profile before they can be used.
2. Tagged Values: Metadata Storage
While stereotypes change the name, Tagged Values allow you to store specific data associated with an element. Imagine a Class representing a database table. You might need to know the table name, the primary key, or the schema version. Instead of writing these in the Class description box, which clutters the diagram, you define them as Tagged Values.
Tagged Values act like key-value pairs attached to model elements. They are crucial for:
- Code generation tools to produce accurate source files.
- Documentation generation to extract specific properties.
- Validation rules that check if a property exists before deployment.
3. Constraints: Logical Rules
Constraints define rules that elements must follow. These are often expressed in Object Constraint Language (OCL) or informal natural language. For example, a constraint might state that a <<Service>> cannot have a direct dependency on a database class. It must go through a Repository layer.
Constraints ensure architectural integrity. They prevent the model from deviating from the agreed-upon patterns for the project.
Creating a Profile Step-by-Step 📝
Constructing a Profile is a logical process. You do not need a specific tool to understand the concept, but the workflow generally involves defining the extension, linking it to the base metaclass, and registering it.
Step 1: Identify the Need
Before drawing anything, determine what is missing from standard UML. Is your team using a specific design pattern frequently? Do you have a naming convention that standard UML does not capture? Start with the problem, not the solution.
Step 2: Define the Stereotypes
Create a new stereotype definition. Assign it a name that is clear and distinct. Avoid generic names like “NewElement.” Use domain-specific terms like <<APIEndpoint>> or <<Repository>>.
Ensure the stereotype is linked to the correct base metaclass. If you are creating a stereotype for a Class, it must extend the Classifier metaclass.
Step 3: Add Tagged Values
For each stereotype, decide what additional data is needed. Define the name, data type, and default value for each Tagged Value. Common data types include String, Integer, Boolean, or Enumeration.
Example:
- Name: tableName
- Type: String
- Default: null
Step 4: Establish Constraints
Write down the rules that govern the use of your new stereotypes. These rules should be documented in the Profile itself. This ensures that other developers reading the model understand the limitations.
Step 5: Package and Distribute
Once defined, the Profile should be saved as a reusable artifact. This allows other projects to import the same definitions, ensuring consistency across the organization.
Stereotypes vs. Standard UML 🔍
A common point of confusion is deciding when to use a standard UML element versus creating a custom stereotype. The distinction lies in the level of abstraction.
| Feature | Standard UML Element | Profile Stereotype |
|---|---|---|
| Scope | General purpose, applicable to any domain. | Specific to a project, language, or architecture. |
| Visuals | Standard icons and shapes (e.g., rectangle for Class). | Same shape, but with a specific label prefix/suffix. |
| Metadata | Fixed set of properties. | Custom properties via Tagged Values. |
| Usage | Communication of general structure. | Communication of specific implementation details. |
If your diagram needs to be understood by an external stakeholder who does not know your project’s specific technology, stick to standard UML. If the audience consists of your development team who needs to generate code or understand deployment logic, a Profile is the correct choice.
Applying Profiles to Models 🧩
Once a Profile is defined, it must be applied to the actual model. This process is known as “applying a profile.” It involves selecting elements in your Class Diagram, Use Case Diagram, or Component Diagram and attaching the defined stereotypes.
Integration with Class Diagrams
Class Diagrams are the most common place to apply Profiles. You might take a generic Class and mark it as <<Entity>, <<DTO>, or <<Controller>. This visual cue helps developers quickly identify the role of the class without reading the code.
When applying these, ensure that the relationships between elements also respect the architecture. For instance, a Controller should not depend directly on an Entity. This rule is often enforced by the Profile’s constraints.
Integration with Component Diagrams
Profiles are also useful in Component Diagrams to denote deployment units. You can define stereotypes like <<Server>, <<Database>, or <<Container>. This helps in visualizing the infrastructure layout alongside the software structure.
Common Pitfalls for Beginners ⚠️
Even with a solid understanding of the theory, mistakes happen. Here are common issues junior developers encounter when working with Profiles.
1. Over-Engineering
Do not create a stereotype for every single class. If you find yourself creating a new stereotype for a Class, ask if a standard stereotype or a comment would suffice. Profiles add complexity. If the complexity does not yield clear value, it becomes noise.
2. Inconsistent Naming
Ensure that the names of your stereotypes are consistent across all diagrams. If you use <<Service> in one diagram and <<BusinessLogic> in another for the same concept, the model becomes confusing. Maintain a glossary.
3. Ignoring Constraints
Defining a stereotype is useless if you do not enforce how it is used. Always write down the constraints associated with the stereotype. This documentation is vital for onboarding new team members.
4. Hardcoding Values
Avoid hardcoding specific values into the model. Use Tagged Values for properties that might change. If you hardcode a database schema name into the diagram, changing the environment (e.g., from Dev to Prod) requires manual model editing.
Collaboration and Standards 🤝
UML is a collaborative language. A Profile is only as good as the team’s agreement on its usage. When introducing a new Profile to a project, follow these guidelines:
- Documentation: Create a user guide for the Profile. Explain what each stereotype means and when to use it.
- Review: Include Profile usage in code and model reviews. Ensure developers are not misusing stereotypes.
- Evolution: Profiles are not static. As the project evolves, you may need to add new stereotypes or deprecate old ones. Communicate these changes clearly.
- Tool Support: Ensure that the modeling tools used by the team support the Profile definitions. If one developer uses a different tool, the Profile might not render correctly.
Integration with MDA 🔄
Model Driven Architecture (MDA) relies heavily on Profiles. MDA separates the system specification from the platform details. Profiles are the bridge that connects the platform-independent model (PIM) to the platform-specific model (PSM).
For example, you might have a PIM Class that represents a data entity. A Profile specific to the Java platform might add a stereotype <<EJB>> to that class, indicating that it should be generated as an Enterprise Java Bean. This allows the model to remain abstract while still driving specific code generation.
This separation is powerful because it allows you to switch implementation platforms without rewriting the entire model. You simply swap the Profile.
Maintenance and Refactoring 🔧
Like code, models degrade over time if not maintained. Profiles are no exception. A Profile that was perfect six months ago might be outdated today.
Refactoring Profiles
When refactoring a model, check the Profiles. Are there stereotypes that are no longer used? Are there Tagged Values that are empty? Clean up the model to reflect the current state of the application. Do not leave dead definitions in the Profile.
Versioning
Assign version numbers to your Profiles. If you update a stereotype definition, you might break existing diagrams that rely on the old version. Versioning allows you to migrate diagrams gradually without losing history.
Summary of Best Practices ✅
To summarize the path forward for a junior developer engaging with UML Profiles:
- Start Small: Begin with a few key stereotypes that solve immediate problems.
- Stay Consistent: Follow the naming conventions defined in your team’s standards.
- Document Everything: A stereotype without a definition is just a label.
- Validate Often: Use constraints to catch errors early.
- Keep it Simple: If a standard Class works, use a standard Class.
Mastering UML Profiles is a journey of understanding how to communicate intent. It moves you from drawing boxes and arrows to defining the logic of the system. By following these guidelines, you ensure that your models remain clear, useful, and aligned with the engineering reality of your project.
Deep Dive: The Metamodel Relationship 🧩
For those interested in the theoretical underpinnings, it is crucial to understand the relationship between a Profile and the UML Metamodel. The UML Metamodel defines the rules of the language. It is a model of the model.
When you create a Profile, you are creating a new Metaclass that extends the existing Metamodel. This extension is achieved through the Extension mechanism. The Profile defines a new Classifier that is linked to an existing Metaclass.
For example, a Class in UML is an instance of the Classifier Metaclass. A Profile might define a new Classifier called “BusinessClass” which is also an instance of Classifier, but with additional properties. This hierarchical structure ensures that the Profile does not break the core logic of UML.
Understanding this hierarchy helps in debugging. If a stereotype is not appearing, check if the extension relationship is correctly defined in the Profile definition. If the link to the Metaclass is missing, the tool may not recognize the stereotype as valid.
Future Trends and Adaptability 📈
The software landscape changes rapidly. New architectures like Serverless or Event-Driven require new modeling concepts. Profiles provide the flexibility to adapt UML to these changes without waiting for the UML specification itself to update.
As a developer, you are not just a consumer of the standard; you are an active participant in shaping how your team models the system. By creating Profiles that reflect modern patterns, you contribute to the evolution of your organization’s documentation standards.
Keep an eye on emerging patterns. If your team adopts a new pattern, consider if a new stereotype is needed. If the pattern becomes standard, you might be able to remove the custom stereotype and rely on standard UML again. This cycle of creation and standardization is part of the maturity of a modeling practice.
Final Thoughts 💡
UML Profile Diagrams are a powerful tool for bridging the gap between abstract design and concrete implementation. They allow junior developers to take ownership of the architectural vocabulary used within their team. By focusing on clarity, consistency, and constraints, you can create models that are not just drawings, but living documents that guide development.
Remember, the best model is the one that is actually used. Do not create a Profile that is too complex to maintain. Start with the basics, iterate based on feedback, and always keep the end-user of the model in mind. With patience and practice, you will find that Profiles become an essential part of your technical toolkit.