


Unified Modeling Language (UML) provides a standardized visual language for software architecture. However, generic diagrams often lack the specificity required for complex domain-specific systems. This is where the UML Profile mechanism becomes essential. A profile allows you to extend the core UML metamodel without altering its fundamental rules. By designing effective profile diagrams, you create a tailored notation that communicates precise requirements to stakeholders and developers.
This guide provides a comprehensive breakdown of the design process. We will explore the theoretical underpinnings, practical steps for creation, and the strategic considerations required to maintain consistency across large projects. Whether you are working on embedded systems, enterprise architecture, or specialized domain modeling, understanding profiles is a critical skill.
🧩 Understanding the UML Profile Concept
A UML Profile is not a separate language; it is a mechanism for customizing UML. Think of it as a layer of metadata that sits on top of the standard UML elements. It allows you to define new stereotypes, tagged values, and constraints that apply to specific elements in your model.
Without profiles, teams often resort to ad-hoc notations that lead to confusion. A profile ensures that when a developer sees a specific icon or notation, they understand its exact semantic meaning based on a pre-defined extension. This standardization reduces ambiguity and improves the quality of the model.
Why Use Profiles?
- Domain Specificity: Adapt UML to specific industries like healthcare, finance, or aerospace.
- Abstraction Control: Hide implementation details or expose specific architectural layers as needed.
- Consistency: Ensure all team members use the same extended terminology.
- Constraint Enforcement: Add specific rules (often via OCL) that standard UML does not cover.
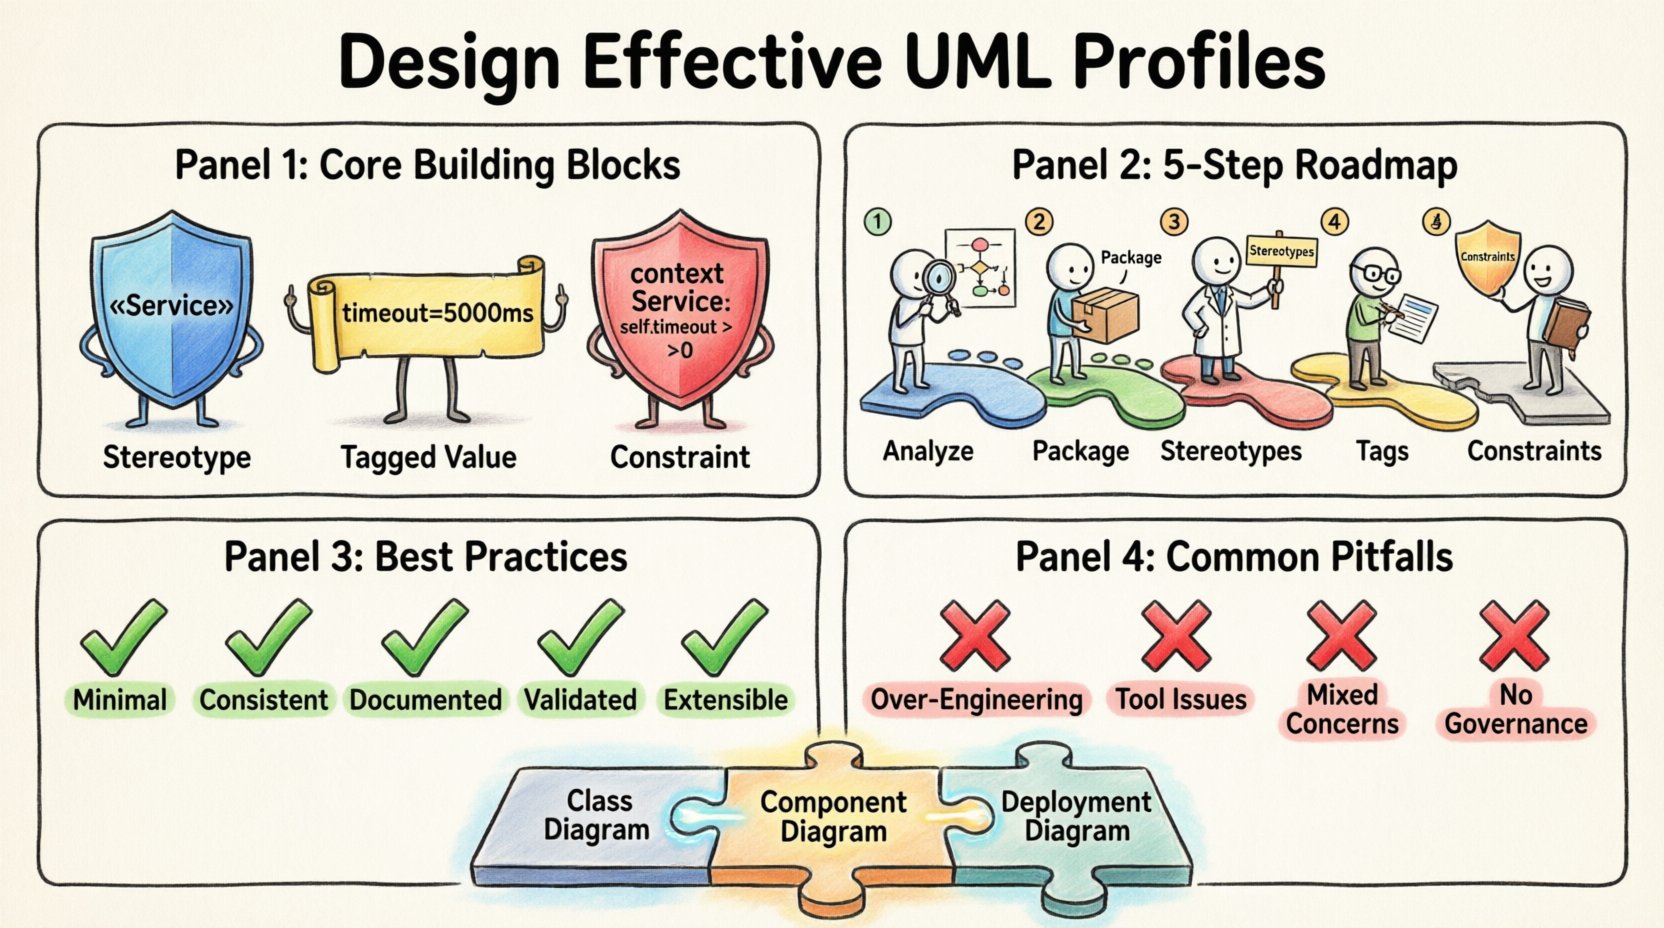
🏗️ Core Components of a Profile
To design a profile effectively, you must understand its building blocks. A profile is typically packaged and contains specific elements that modify how UML classes, associations, and other elements are interpreted.
1. Stereotypes
Stereotypes are the primary mechanism for extension. They allow you to classify a UML element into a new category. For example, a standard Class element can be stereotyped as «Entity», «Service», or «Controller». This visual cue immediately tells the reader the role of the element within your specific domain.
When defining a stereotype, you choose the metaclass it extends. Most often, this is Class, but it can also be Package, Association, or Component.
2. Tagged Values
While stereotypes define the type of an element, tagged values define its properties. These act like key-value pairs attached to a model element. For instance, a «Service» stereotype might have a tagged value named protocol with a value of REST, or timeout set to 5000ms.
Tagged values are crucial for capturing metadata that influences code generation or runtime behavior without cluttering the diagram with text.
3. Constraints
Constraints add logical rules to the model. These are often expressed using the Object Constraint Language (OCL). A constraint can specify that a certain relationship must be mandatory, or that a specific attribute must follow a naming convention.
For example, you might define a constraint stating that a «Database» element must always have an associated «Connection» element. This enforces structural integrity within your profile.
📋 Designing the Profile: Step-by-Step Process
Creating a profile requires a structured approach. Rushing into element creation often leads to inconsistencies later. Follow this logical sequence to ensure a robust design.
Step 1: Analyze Domain Requirements
Before drawing anything, identify the gaps in standard UML for your specific context. What concepts exist in your domain that standard UML classes cannot represent accurately? List the recurring patterns, specific attributes, or unique relationships.
Ask these questions:
- What terminology does the business use?
- Are there specific validation rules we need to enforce?
- Do we need to distinguish between different types of components that UML treats as identical?
Step 2: Define the Profile Package
Create a dedicated package to hold the profile definition. This package should contain the profile itself and any related supporting elements. Naming this package clearly is vital for navigation. Use a name that reflects the domain, such as HealthcareProfile or FinancialModelingProfile.
Step 3: Create Stereotypes
Based on your requirements, define the necessary stereotypes. Start with the most critical ones. Keep the list concise; too many stereotypes can dilute the meaning of each one.
For each stereotype:
- Assign a clear name (e.g.,
«Repository»). - Select the correct base metaclass (usually
ClassorComponent). - Define the display icon if your modeling environment supports it.
Step 4: Add Tagged Values
Attach relevant properties to your stereotypes. These values should be actionable. Avoid vague attributes. If a value is used for documentation only, consider using notes instead of tagged values.
Ensure data types are consistent. For example, if you define a version tagged value, decide if it will be a String, Integer, or Semantic Versioning format.
Step 5: Define Constraints
Write the constraints that govern the behavior of your profile elements. Use OCL for formal logic. This step ensures that the model remains valid according to your specific rules.
Document these constraints clearly. Future maintainers need to understand why a relationship is forbidden or required.
📊 Comparing Profile Elements
To clarify the distinctions between the components, refer to the table below. Understanding the difference helps in applying the right element at the right time.
| Element | Purpose | Example | Usage Context |
|---|---|---|---|
| Stereotype | Classifies an element | «API» on a Class |
High-level categorization |
| Tagged Value | Stores specific data | version = 1.0 |
Metadata and configuration |
| Constraint | Enforces logic/rules | pre: user is authenticated |
Validation and rules |
| Property | Defines structural attribute | interfaceType: String |
Element definition |
🚀 Best Practices for Profile Design
Effective profiles are maintainable and scalable. Poorly designed profiles become technical debt that slows down development. Adhere to these guidelines to ensure longevity.
1. Keep It Minimal
Do not create a stereotype for every minor distinction. If standard UML handles it, use standard UML. Profiles should only be used when standard notation fails to convey meaning. A bloated profile confuses users and makes the model harder to read.
2. Ensure Consistency
Once a stereotype is defined, it must be used consistently across the entire model. If a «Service» implies a REST endpoint in one diagram, it must do so in all diagrams. Inconsistency leads to misinterpretation during code generation or implementation.
3. Document the Rationale
Why was this stereotype created? What problem does it solve? Include documentation within the profile definition. This is crucial for onboarding new team members or when revisiting the model years later.
4. Validate Against the Metamodel
Ensure your stereotypes extend valid metaclasses. You cannot extend a metaclass with properties that contradict its core definition. For example, extending a Package to behave like a Class with methods will cause structural errors in the modeling environment.
5. Plan for Extensibility
Design your profile with future changes in mind. Will you need to add more tagged values later? Will the base metaclass change? Structure the profile so that additions do not require a complete redesign.
⚠️ Common Pitfalls to Avoid
Even experienced modelers make mistakes when working with profiles. Being aware of these common errors can save significant time.
Pitfall 1: Over-Engineering
Creating complex profiles for simple projects. If a project uses standard UML effectively, adding a profile adds unnecessary overhead. Use profiles only when the domain complexity demands it.
Pitfall 2: Ignoring Tool Support
Not all modeling environments support every aspect of the profile standard equally. Some tools handle stereotypes well but struggle with complex OCL constraints. Verify that your chosen environment supports the features you plan to implement.
Pitfall 3: Mixing Concerns
Do not mix architectural concerns with implementation details in the same profile. Keep your architectural profile distinct from your deployment or database-specific profiles. This separation makes it easier to switch contexts.
Pitfall 4: Lack of Governance
Allowing anyone to add new stereotypes without review leads to a fragmented notation system. Establish a governance process where profile changes are reviewed and approved by a lead architect or modeler.
🔄 Integrating Profiles with Other Diagrams
A profile is most powerful when it integrates seamlessly with other diagram types. It is not a standalone artifact; it enhances the entire modeling suite.
Class Diagrams
Profile elements are most visible here. Stereotypes on classes, tagged values on attributes, and constraints on operations make the class diagram domain-specific. This is the primary canvas for profile application.
Component Diagrams
Profiles can define specific types of components. For instance, a «Microservice» stereotype might imply specific deployment characteristics. This helps bridge the gap between design and deployment.
Deployment Diagrams
Use profiles to define specific node types. Instead of generic servers, use «LoadBalancer» or «DatabaseServer» stereotypes. This clarifies the infrastructure topology.
🛠️ Maintenance and Lifecycle Management
A profile is a living artifact. It evolves as the system and the team’s understanding of the domain evolve. Regular maintenance is required.
Versioning the Profile
Just like code, profiles should be versioned. If you change a constraint or add a new stereotype, update the profile version. This allows teams to track which version of the profile a specific model was created with.
Deprecation Strategy
When a stereotype is no longer needed, mark it as deprecated rather than deleting it immediately. This prevents errors in older models while signaling to new users that it should not be used. Transition plans should be in place to migrate old models to the new standard.
Review Cycles
Schedule periodic reviews of the profile. Ask the team if the current stereotypes still align with the project’s needs. Remove unused elements to keep the profile lean and effective.
🔗 Interoperability and Standards
One of the strongest features of UML profiles is their potential for interoperability. While profiles are often created for internal use, adhering to standards can facilitate collaboration.
MOF Compatibility
Profiles are defined using the Meta Object Facility (MOF). Ensuring your profile is MOF-compliant allows it to be imported into different modeling tools that support the standard. This prevents vendor lock-in.
External Metadata Sharing
Some industries have standard profiles. For example, the Model Driven Architecture (MDA) defines specific profiles for platform-independent and platform-specific models. Leveraging these standard profiles can reduce the need to design from scratch.
📝 Final Thoughts on Profile Implementation
Designing effective UML profile diagrams is a balance between standardization and flexibility. It requires a deep understanding of both the UML specification and the specific domain you are modeling. By following the structured approach outlined in this guide, you can create profiles that enhance clarity, enforce rules, and streamline development.
Remember that a profile is a contract between the modeler and the consumer of the model. It promises a specific level of detail and structure. Honoring that contract through careful design and maintenance ensures that your diagrams remain valuable assets throughout the software lifecycle.
Start small. Define a few critical stereotypes, test them in a real model, and iterate. As your confidence grows, you can expand the profile to cover more complex aspects of your system. The goal is not complexity, but clarity. A well-designed profile makes the complex simple.
Invest time in this foundation. The effort spent designing a robust profile pays dividends in reduced communication errors, faster code generation, and more reliable system documentation. It is a strategic investment in the quality of your engineering output.
As you move forward, keep the user experience in mind. If the profile is too difficult to use, teams will bypass it. Ensure the notation is intuitive and the value is immediately apparent. This user-centric approach is the key to successful adoption and long-term success.