


Unified Modeling Language (UML) provides a standardized syntax for software design, yet standard notation often falls short when addressing specific industry needs or architectural constraints. This is where the concept of a UML Profile Diagram becomes essential. A profile allows modelers to extend the UML metamodel without altering the core specification. It introduces a layer of customization that preserves compatibility while enabling domain-specific expression.
Understanding how to construct these profiles requires a shift from viewing diagrams as static representations to seeing them as dynamic extensions of a logical framework. This guide explores the mechanics of profile creation, the structural requirements for defining stereotypes, and the practical implications for model management.
🧩 The Purpose of a UML Profile
A profile is not merely a collection of icons or custom shapes. It is a formal extension mechanism defined within the UML specification. Its primary function is to add new semantic meaning to existing elements. When a developer or architect encounters a specific requirement that standard UML classes or components cannot express, a profile provides the vocabulary to do so.
Consider a scenario where a system requires specific metadata regarding compliance, security levels, or deployment targets. Standard UML classes lack attributes for these specific details. By creating a profile, you define a stereotype that attaches to a standard class, effectively saying, “This is a standard class, but with these specific characteristics.”
- Standardization: Profiles ensure that specific extensions remain consistent across a project.
- Interoperability: Profiles are designed to be saved in XMI (XML Metadata Interchange), ensuring they can be read by different modeling tools.
- Abstraction: They allow for high-level modeling that abstracts away implementation details while retaining necessary semantic data.
🏗️ Core Components of a Profile
To build a robust profile, one must understand the three pillars that support its structure. These components work together to define how the model behaves and what information it carries.
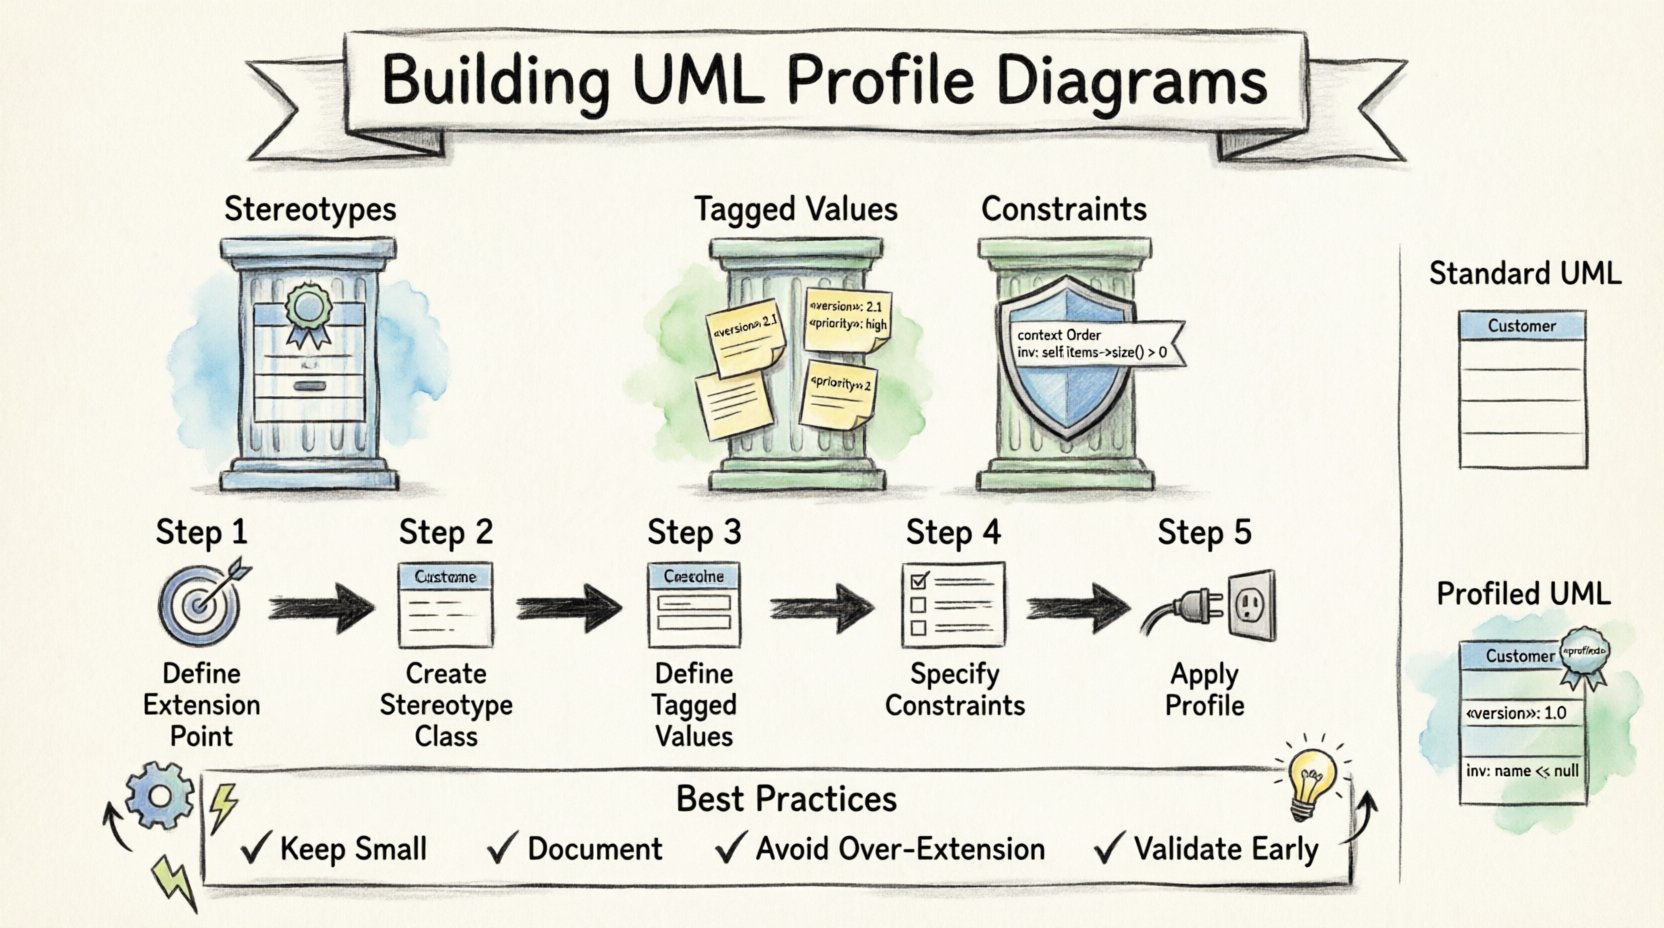
1. Stereotypes
The stereotype is the fundamental building block of a profile. It is a modifier that extends a classifier. When applied to an element, it changes the visual representation and the semantic interpretation of that element. For example, a standard Class element can become a <<Service>> or <<Database>> entity.
Technically, a stereotype is a class derived from the St stereotyped metaclass. It does not replace the base element but adds a specific context to it. This ensures that the underlying relationships and inheritance structures of UML remain valid.
2. Tagged Values
While stereotypes define the *type* of an element, tagged values define the *properties* of that type. They act as key-value pairs attached to the stereotype. This allows for dynamic data entry within the model.
For instance, if you create a stereotype for a <<API Endpoint>>, you might need tagged values for:
- Method: (String) – e.g., GET, POST
- Version: (Integer) – e.g., 1.0.2
- Auth: (Boolean) – e.g., True, False
Tagged values provide the necessary granularity for documentation generation and code scaffolding.
3. Constraints
Constraints define the rules that must be followed when using a profile element. These are often expressed in OCL (Object Constraint Language). Constraints ensure that a model remains valid according to the domain logic defined by the profile.
Without constraints, a profile is merely a naming convention. With constraints, it becomes a validation rule. For example, a constraint might dictate that a <<CriticalComponent>> must always have a redundancy relationship linked to it.
📊 Structure Comparison: Standard Elements vs. Profiled Elements
Visualizing the difference between standard UML modeling and profile-based modeling helps clarify the value proposition. The table below outlines the structural differences.
| Feature | Standard UML Element | Profiled UML Element |
|---|---|---|
| Base Semantics | Generic (e.g., Class, Component) | Generic + Domain Specific (e.g., <<Service>> Class) |
| Metadata | Limited to standard properties | Extended via Tagged Values |
| Visual Notation | Standard icons | Custom icons or labels (stereotype text) |
| Validation | UML Syntax Rules | UML Rules + Profile Constraints |
| Reusability | High | High (if profile is shared) |
🛠️ The Process of Building a Profile
Constructing a profile is a deliberate engineering task. It requires planning the extension points before any drawing begins. The process involves defining the metamodel extension, specifying the elements, and linking them to the base UML library.
Step 1: Define the Extension Point
Every profile must extend a specific part of the UML metamodel. You must identify which metaclass you are extending. Common targets include Class, Component, Interface, or Relationship.
If you are modeling a database schema, you might extend the Class metaclass. If you are modeling a network topology, you might extend the Component metaclass. This selection dictates which elements in your diagram can accept the new stereotype.
Step 2: Create the Stereotype Class
Once the extension point is selected, you create a new class within the profile package that inherits from the Stereotype metaclass. This class represents the new semantic concept. It should be named clearly to reflect its domain purpose.
Best practices for naming include:
- Use noun phrases (e.g.,
ApplicationLayerrather thanAppLayer). - Avoid keywords that might conflict with the underlying metamodel.
- Keep the name consistent with industry terminology.
Step 3: Define Tagged Values
Within the stereotype class, you define the attributes that will become tagged values. These are properties that will appear when a user selects the stereotype and opens its properties dialog. Each tagged value must have a data type.
Common data types include:
- String: For text descriptions, names, or codes.
- Integer: For version numbers, counts, or IDs.
- Boolean: For flags like
IsEncryptedorIsDeprecated. - Enumeration: For restricted choices (e.g.,
Priority: Low, Medium, High).
Step 4: Specify Constraints
Constraints ensure the integrity of the profile usage. You define these rules using formal language or structured text. A constraint might specify that a specific tagged value is required if another is present.
For example:
- IF
SecurityLevelis set toHigh, THENEncryptionTypemust be defined. - IF
TypeisDatabase, THENStorageEnginemust be selected.
Step 5: Apply the Profile to the Model
The final step is linking the profile to the main model. This registration process makes the stereotypes available in the palette or library of the modeling environment. Once applied, the modeler can drag and drop the stereotype onto the appropriate base element.
This action does not duplicate the element. It simply marks the existing element as an instance of the stereotype, inheriting all base UML behaviors while gaining the new semantic properties.
🔄 Managing Profile Inheritance and Nesting
Complex systems often require multiple profiles to work in tandem. UML supports profile inheritance, allowing one profile to extend another. This promotes modularity and reduces redundancy.
Profile Inheritance
When Profile A extends Profile B, all stereotypes defined in Profile B are available in Profile A. This is useful when you have a general profile (e.g., <<CoreSystem>>) and a specific one (e.g., <<WebApp>>).
- Benefits: Reduces the need to redefine common stereotypes.
- Considerations: Changes in the base profile affect all derived profiles.
Nesting Profiles
Profiles can also be nested within packages. This allows for organization based on domain layers. You might have a package for DomainLogic containing specific profiles, and a package for Infrastructure containing others.
However, excessive nesting can make the model difficult to navigate. It is recommended to keep the profile hierarchy flat unless there is a distinct logical reason for separation.
📝 Best Practices for Profile Design
Designing a profile is an exercise in balance. Too few features make the profile useless; too many make it complex and difficult to maintain. Adhering to established patterns ensures longevity and usability.
1. Keep Profiles Small and Focused
A profile should address a specific problem domain. If you find yourself adding unrelated stereotypes to a single profile, consider splitting it. For example, separate a <<Security>> profile from a <<Performance>> profile.
2. Document the Profile
Just as code requires documentation, profiles require definitions. Include a description for the profile itself, as well as for each stereotype and tagged value. This documentation should explain the intent, not just the syntax.
- What business rule does this stereotype represent?
- What are the valid values for this tagged value?
- How does this element interact with other system components?
3. Avoid Over-Extension
Do not use profiles to solve problems that can be handled by standard UML relationships. If a relationship is simply a dependency, do not create a stereotype for it unless the dependency carries unique semantic meaning. Over-stereotyping leads to a cluttered model where standard semantics are lost.
4. Validate Early
Test the profile on a small subset of the model before rolling it out. Check that the tagged values are accessible, the constraints fire correctly, and the visual representation is clear. Early validation prevents structural debt.
🚫 Common Pitfalls to Avoid
Even experienced architects make mistakes when extending the UML metamodel. Being aware of these common errors can save significant time during the modeling lifecycle.
| Pitfall | Consequence | Mitigation Strategy |
|---|---|---|
| Ignoring Base Semantics | Elements lose standard relationships. | Always ensure stereotypes extend valid UML classifiers. |
| Hardcoding Values | Model becomes rigid and hard to change. | Use Tagged Values instead of hard-coded text in labels. |
| Creating Circular Dependencies | Profile loading fails or model corruption occurs. | Ensure no profile depends on another profile that depends on it. |
| Naming Conflicts | Tooling errors or ambiguity. | Use unique namespaces for profile packages. |
🌐 Profiles in Model Interchange (XMI)
One of the strongest arguments for using profiles is interoperability. The UML specification defines how profiles are serialized in XMI. This means a profile created in one environment can be imported into another, provided the target tool supports the profile version.
When exporting a model:
- The profile definition is exported as a package.
- The stereotypes are exported as classes within that package.
- The instances of stereotypes are marked with the stereotype name in the XML attributes.
This ensures that the semantic meaning of the model travels with the data. You are not just moving a diagram; you are moving the rules that govern the diagram.
🛡️ Maintenance and Versioning
Profiles are living artifacts. As business requirements evolve, the profile must evolve with them. However, changing a profile can break existing models. Versioning is critical.
Versioning Strategy
Assign a version number to each profile. When a change is made that breaks backward compatibility, increment the major version. Minor changes can increment the minor version.
- Major Change: Removing a tagged value or changing a data type.
- Minor Change: Adding a new stereotype or adding a new tagged value.
Deprecation
If a stereotype is no longer needed, do not simply delete it. Mark it as deprecated in the profile documentation. This allows legacy models to remain valid while guiding new work toward the updated standard.
🔮 Future-Proofing Your Models
The landscape of software architecture is constantly shifting. New paradigms like microservices, event-driven architecture, and cloud-native design require new modeling standards. Profiles are the mechanism that allows UML to adapt without waiting for the core specification to change.
By investing time in building well-structured profiles, you create a foundation that supports rapid development and clear communication. You are building a vocabulary that your team and tools can understand, ensuring that the model remains a useful asset throughout the system’s lifecycle.
📌 Summary of Key Takeaways
- Profiles extend UML: They add meaning to standard elements without breaking the specification.
- Three Pillars: Stereotypes, Tagged Values, and Constraints are the core components.
- Structure Matters: Define extension points clearly before creating elements.
- Validation is Key: Constraints ensure the profile is used correctly.
- Maintainability: Document and version profiles to handle future changes.
- Interoperability: Profiles enable model sharing across different tools via XMI.
Building a UML Profile Diagram is a technical discipline that blends architecture with language design. It requires precision, foresight, and a deep understanding of the underlying metamodel. When executed correctly, it transforms a static diagram into a robust, semantic model that drives development and documentation effectively.