


Creating a UML Profile Diagram is a specialized task within software architecture modeling. It allows engineers to extend the standard Unified Modeling Language (UML) to fit specific domain needs. This process, known as metamodeling, defines new concepts without altering the core language. A profile diagram organizes these extensions, making them reusable across different models. This guide details the logical construction of profiles, focusing on structure, semantics, and application. No specific software is referenced; the principles apply universally to any modeling environment that supports the UML standard.
Understanding the Core Concepts 🧠
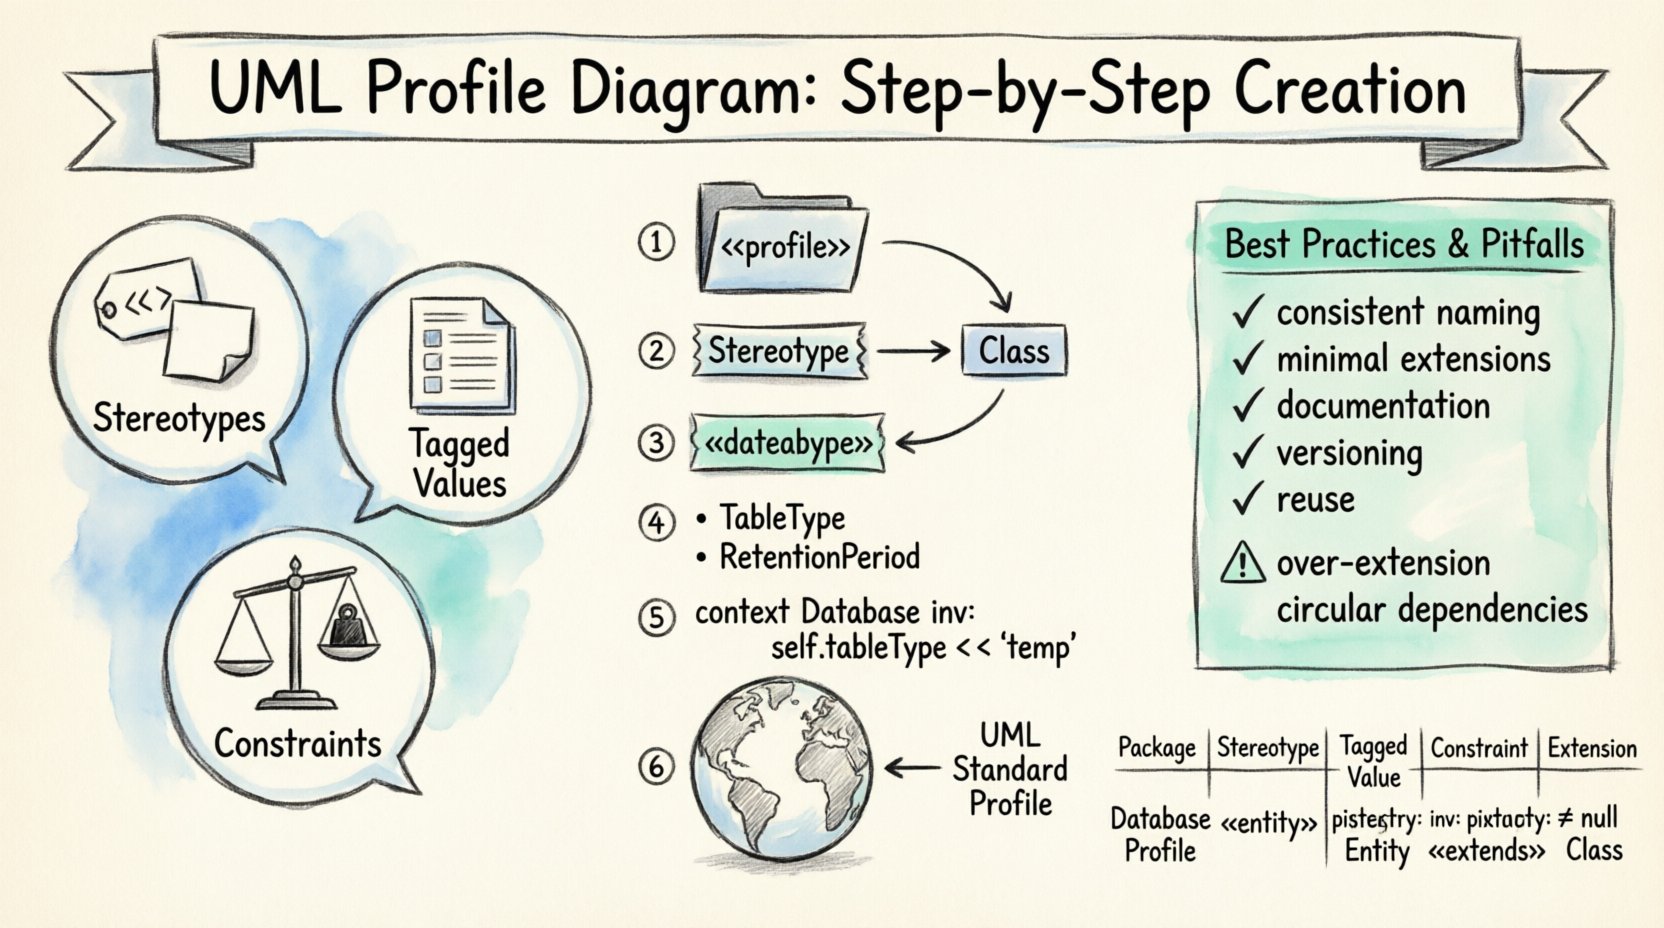
Before beginning the creation process, it is essential to understand what a profile actually is. A UML profile is a mechanism to customize the UML metamodel. It does not change the standard syntax but adds new vocabulary. This vocabulary consists of stereotypes, tagged values, and constraints.
- Stereotypes: These are extensions that allow you to define new types of model elements. For example, a standard Class becomes a "Service" or a "Database" depending on the stereotype applied.
- Tagged Values: These are attributes associated with stereotypes. They allow you to store specific data about the element, such as "Priority" or "Author".
- Constraints: These are rules that restrict the use of the model. They ensure that the model remains valid according to the specific domain requirements.
Profiles are contained within a Package. This package acts as a namespace. When you create a profile, you are essentially creating a new package that extends an existing metaclass. The relationship between the profile and the base UML element is established through an Extension relationship.
Prerequisites for Creating a Profile 📋
To successfully construct a profile, certain foundational knowledge is required. You must understand the base UML metamodel. This includes knowing the structure of Classes, Associations, and Packages. Additionally, you need a clear definition of the domain you are modeling. A profile is useless if it does not solve a specific problem.
Ensure you have the following ready:
- A clear list of domain-specific concepts.
- A defined set of attributes for each concept.
- A understanding of how these concepts relate to standard UML elements.
- Validation rules for the new concepts.
Without these prerequisites, the resulting profile may become ambiguous or difficult to maintain. Clarity in the initial design phase prevents significant rework later.
Step-by-Step Creation Process 📝
The creation of a UML Profile Diagram follows a logical sequence. Each step builds upon the previous one. Follow this procedure to ensure a robust structure.
Step 1: Define the Package 📦
The first action is to create a new Package. This Package will serve as the container for the entire profile. Give it a descriptive name that reflects the domain. For example, "EnterpriseSystemProfile" or "WebAppProfile". This Package is the root of the profile hierarchy.
Within this package, you will define the extension relationships. These relationships link the profile elements to the standard UML metaclasses. Ensure the namespace is correctly configured so that other models can import and use this profile.
Step 2: Extend the Metaclass 🔗
Next, identify the base UML metaclass you wish to extend. Common choices include Class, Component, or Actor. You must create a Stereotype that inherits from this metaclass. This is done through an Extension relationship.
The process involves:
- Selecting the target metaclass (e.g., Class).
- Defining the new stereotype name.
- Linking the stereotype to the metaclass.
This link signifies that any element with this stereotype is technically a Class, but with added properties. This maintains compatibility with the standard UML tools while adding custom functionality.
Step 3: Define Stereotypes 🏷️
Stereotypes are the heart of the profile. You will likely create multiple stereotypes for different scenarios. Each stereotype represents a distinct type of element within your domain.
When defining a stereotype:
- Use a clear, camelCase or PascalCase naming convention.
- Ensure the name describes the role of the element (e.g., "DatabaseTable").
- Keep the name short to avoid clutter in diagrams.
Remember that stereotypes are visualized using guillemets (<< >>) in diagrams. This visual cue helps users immediately recognize the custom nature of the element.
Step 4: Add Properties (Tags) 📄
Standard UML elements have limited attributes. Profiles allow you to add new attributes, known as Tagged Values. These are attached to the Stereotype.
For a "DatabaseTable" stereotype, you might add tags like:
- TableType: Defines if it is a transactional or log table.
- RetentionPeriod: Specifies how long data is kept.
- EncryptionLevel: Indicates the security standard applied.
Each tag must have a data type. Common types include String, Integer, Boolean, and Enumeration. Defining the data type early prevents validation errors during model execution.
Step 5: Apply Constraints ⚖️
Constraints ensure the integrity of the model. They are rules that must be satisfied. You can apply constraints at the package level or element level.
Use Object Constraint Language (OCL) or informal constraints to define rules. For example, a constraint might state that a "Service" stereotype cannot exist without a "Interface" stereotype. This enforces architectural standards automatically.
Step 6: Link to Namespace 🌐
The final step in creation is making the profile available to other models. This involves defining the Namespace. A namespace is a scope where the profile elements are visible.
To make the profile usable:
- Export the profile package.
- Ensure the extension relationships are correctly resolved.
- Document the import path for other users.
Without proper namespace linkage, the profile remains isolated and cannot be applied to external models.
Visualizing the Profile Structure 📊
Understanding the layout of a profile diagram is crucial for maintenance. A well-structured diagram groups related elements logically. Below is a table outlining the essential components of a profile diagram.
| Component | Function | Example |
|---|---|---|
| Package | Container for the profile | <<profile>> WebProfile |
| Stereotype | Defines new element type | <<Controller>> |
| Tagged Value | Custom attribute | methodCount: Integer |
| Constraint | Validation rule | mustHaveInterface() |
| Extension | Links stereotype to metaclass | extends Class |
This table serves as a checklist when reviewing your profile diagram. Ensure every component is accounted for to avoid structural gaps.
Applying Profiles in Models 🔄
Once created, a profile must be applied to actual models. This is where the value of the profile is realized. The application process involves importing the profile and selecting the appropriate stereotype for model elements.
Importing the Profile
Open the target model. Locate the profile management section. Import the profile package you created. Verify that the extension relationships are loaded correctly. If the import fails, check the namespace configuration.
Using Stereotypes
To apply a stereotype:
- Right-click on the target element (e.g., a Class).
- Select the option to apply a stereotype.
- Choose from the list provided by the profile.
The element will now display the stereotype notation. You can then fill in the Tagged Values specific to that element. This ensures consistency across the entire project.
Validation
After applying stereotypes, run a validation check. This confirms that all constraints are met. For instance, if a constraint requires a specific Tagged Value, the validator should flag any element missing it. This step is critical for maintaining data integrity.
Best Practices for Maintainability ✅
A profile is a living artifact. It evolves as the project requirements change. To ensure long-term success, adhere to these best practices.
- Consistent Naming: Use a strict naming convention for all stereotypes and tags. This reduces confusion for new team members.
- Minimal Extensions: Only extend the metamodel when absolutely necessary. Over-extending creates complexity and maintenance overhead.
- Documentation: Provide clear documentation for each stereotype. Explain its purpose and usage scenarios.
- Versioning: Manage versions of the profile. If you change a stereotype, ensure backward compatibility or clearly communicate the breaking change.
- Reuse: Design profiles to be reusable across different projects. Avoid hard-coding project-specific logic into the profile structure.
Following these guidelines ensures that the profile remains a helpful tool rather than a burden.
Common Pitfalls to Avoid ⚠️
Even experienced modelers encounter issues. Being aware of common mistakes can save significant time.
Over-Extension
Do not create stereotypes for every minor concept. If a concept can be described using standard UML attributes, do not create a new stereotype. This keeps the model clean and easier to read.
Circular Dependencies
Ensure that stereotypes do not reference each other in a way that creates a loop. For example, Stereotype A extending Stereotype B, which extends Stereotype A. This creates a logical error that prevents model validation.
Ignoring the Metamodel
Do not try to override core UML behavior. Profiles extend the metamodel; they do not replace it. Attempting to change fundamental behaviors can lead to incompatibility with standard tools.
Poor Documentation
Leaving a profile undocumented makes it difficult for others to use. Always include a description for every stereotype and tag. Explain what data should be entered and why.
Integrating with System Architecture 🏗️
Profiles are often part of a larger architecture strategy. They bridge the gap between abstract design and concrete implementation. For example, a profile might define how to model microservices.
Integration steps include:
- Aligning the profile with the architectural style (e.g., SOA, Microservices).
- Ensuring the profile supports the deployment diagrams.
- Mapping the profile elements to coding standards.
This alignment ensures that the design models accurately reflect the final system. It reduces the gap between design and development.
Troubleshooting and Validation 🔍
Issues may arise during the creation or application phase. Here are common solutions.
- Profile Not Found: Check the import path. Ensure the file location is accessible.
- Stereotype Not Visible: Verify that the namespace is correctly registered in the model settings.
- Validation Errors: Review the constraints. Ensure the logic is syntactically correct.
- Visual Clutter: Hide unused tags. If a tag is not needed for the current view, configure the diagram to hide it.
Regular validation checks help catch errors early. Do not wait until the end of the project to validate the model.
Summary of Key Takeaways 📌
Creating a UML Profile Diagram is a structured process that requires attention to detail. It involves defining packages, extending metaclasses, adding stereotypes, and applying constraints. The goal is to create a reusable vocabulary that fits your specific domain. By following the steps outlined in this guide, you can build profiles that enhance clarity and consistency in your modeling efforts.
Remember to prioritize maintainability and documentation. A profile is a shared asset. It should be easy for others to understand and use. Avoid over-complicating the structure. Keep the extensions relevant and necessary. Regularly review and update the profile as requirements evolve.
With a well-crafted profile, your UML models become more powerful. They convey domain-specific meaning that standard UML cannot express alone. This leads to better communication among stakeholders and a more robust final system.