


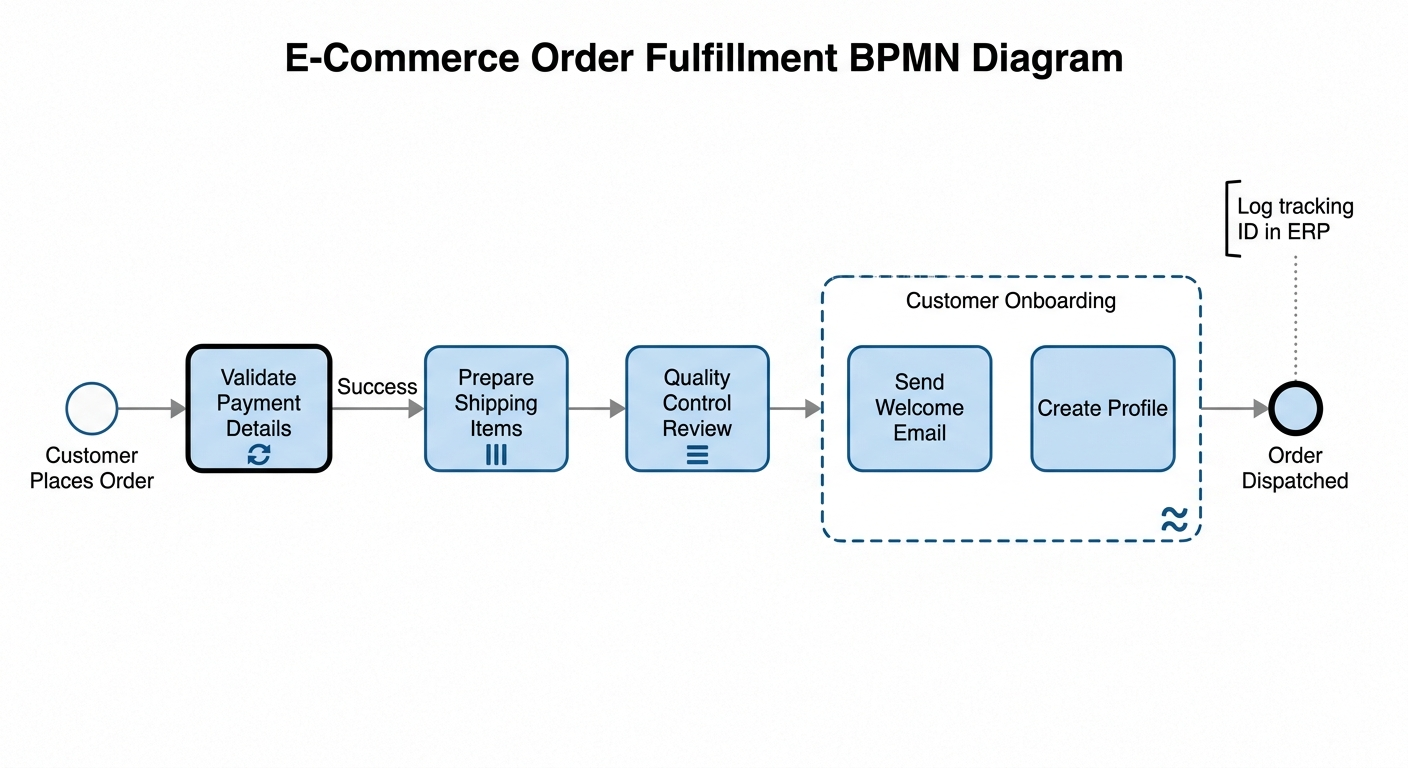
In the realm of Business Process Model and Notation (BPMN), the distinction between a static diagram and a dynamic execution blueprint lies entirely in the use of markers. Markers provide the necessary context to describe complex behaviors—such as repetition, parallel execution, and flexible ordering—directly on the visual elements of the process.
This tutorial deconstructs a comprehensive E-Commerce Order Fulfillment workflow. We will analyze how five specific BPMN markers function within a unified system to optimize an end-to-end fulfillment strategy, transforming a linear flow into a robust, multi-threaded execution model.
1. The Loop Marker: Handling Transient Failures
The first challenge in digital commerce is payment reliability. A transaction might fail not because of a user error, but due to a temporary bank timeout or network latency. A linear process would simply abort the order, but a robust system uses a Loop Marker.
Technical Logic
When applied to the “Validate Payment Details” task, the Loop Marker introduces a retry mechanism. This is critical for handling transient errors. The system does not proceed to fulfillment until a specific boolean condition is met or a hard limit is reached.
The logic typically follows this structure:
// Pseudo-code representation of Loop Logic
retryCount = 0
maxRetries = 3
isAuthorized = false

while (retryCount < maxRetries AND isAuthorized == false) {
    validatePayment();
    retryCount++;
    if (bankResponse == "success") {
        isAuthorized = true;
    }
}
In this workflow, if the authorization fails, the system waits 2 minutes and retries. This ensures that the process only moves forward when the financial transaction is definitively secured.
2. Parallel Multi-Instance: Maximizing Warehouse Throughput
Once payment is secured, the physical fulfillment begins. If an order contains three distinct items (e.g., a book, a laptop sleeve, and pens), processing them one by one creates a bottleneck. This is where the Parallel Multi-Instance Marker is applied.
Execution Strategy
Unlike a loop, which repeats the same task sequentially, a multi-instance task spawns multiple independent instances simultaneously. In the "Prepare Shipping Items" phase:
- Input: A list of items to be picked.
- Execution: The system creates three separate "picking" instances.
- Concurrency: Three different warehouse workers (or robots) receive task slips simultaneously.
This drastically reduces fulfillment lag. The total time taken is determined by the longest individual task, rather than the sum of all tasks.
3. Sequential Multi-Instance: Managing Limited Resources
While the warehouse can pick items in parallel, the final inspection stage often involves a bottleneck: a single specialized scanning machine. You cannot feed three items into a single scanner at once. Here, the workflow switches to a Sequential Multi-Instance Marker.
The Stack Mechanism
The system creates a sequential stack for the "Quality Control Review" task. This ensures that the resource is not over-committed:
- Instance 1: Item 1 is inspected immediately.
- Instance 2: Item 2 enters a "waiting" state until Instance 1 completes.
- Instance 3: Item 3 waits for Instance 2 to clear.
This prevents data collisions and ensures dedicated quality focus for each item without requiring additional hardware.
4. Adhoc Marker: Flexible Subprocess Execution
While the physical box travels to the shipping dock, the digital platform manages the "Customer Onboarding" subprocess. This phase contains tasks like "Send Welcome Email" and "Create Profile."
Non-Deterministic Flow
These tasks do not have a strict dependency; the profile must be created before the email is sent, but the email can be sent immediately after the profile is made. However, depending on server loads or user preferences, the order might vary slightly or occur in a non-linear fashion. The Adhoc Marker allows the system to execute these tasks in any valid order, provided they are all completed before the subprocess ends.
5. Annotation Marker: Bridging Business and IT
Finally, we address the gap between the business process and the engineering implementation. The "Order Dispatched" event is not just a visual end-point; it triggers a backend integration.
An Annotation Marker (specifically a text annotation connected by a dotted line) is attached to this milestone. It reads: "Log tracking ID in ERP database via REST API". This is a non-executable instruction that provides explicit technical guidance to developers, ensuring the physical event is mirrored in the digital ERP system.
Tooling Spotlight: Visual Paradigm
Implementing these markers manually can be tedious. Modern modeling tools like Visual Paradigm streamline this process:
- AI-Powered Generation: Describe your process in natural language (e.g., "Process 10 applications sequentially"), and the AI will automatically apply the correct Sequential Multi-Instance marker.
- Instant Marker Application: Use the floating toolbar to toggle markers on activities instantly without searching shape libraries.
- Validation Engine: The tool prevents specification violations, such as placing an Adhoc marker on a simple Task rather than a Sub-Process.
Conclusion
BPMN markers are the difference between a static picture and a dynamic execution blueprint. By mastering the Loop, Parallel/Sequential Multi-Instance, Adhoc, and Annotation markers, you transform your diagrams from high-level overviews into precise technical specifications.
For beginners, remember this key takeaway: Tasks define what happens; Markers define how it happens. When combined with intelligent tooling like Visual Paradigm, you can model complex, real-world business logic with accuracy and speed.